How to Start a Crowdfunding Campaign Blog
A crowdfunding campaign blog can be one of the most rewarding activities in your campaign strategy but it can also be one of the most difficult and uncertain.
Starting a crowdfunding campaign blog can send thousands of people to your campaign but it will take a lot of work and you need to set it up well before your launch. Use this post to get you started with blogging basics and how to fit it with the rest of your campaign strategy.
I updated this article and posted it on my making money blog, My Work from Home Money, as How to Start a Blog. The new post includes some great ways to get Google search traffic to your blog while I’ve kept all the crowdfunding-specific items in this post.
This post isn’t about convincing you to start a blog for your crowdfunding campaign. For any small business, an online presence should be a given. Even for smaller, one-time campaigns you will need a way to build support before you launch your campaign.
This post is going to be long enough as it is without all the flowery language on how much you need to start a blog. Instead, I am going to guide you step by step through the process of starting a blog for crowdfunding, how to drive a lot of visitors to your blog and how to use that blog traffic to meet your crowdfunding campaign goal.
As someone with five blogs, I can tell you that blogging can be extremely easy or extremely frustrating.
Frustrating if you are not patient and need fast traffic growth while having to learn everything yourself. Reading through this post, you’ll get an idea of just how much has to come together for a successful blog. Now imagine that you had to search and research all of it yourself like I did. It can take a ton of time.
Blogging for your crowdfunding campaign can be easy though if you build a strategy around a simple process of what works.
Starting a Blog for your Crowdfunding Campaign, a Complete Guide
Your first job in creating a blog for your crowdfunding campaign is to pick a domain name, which is the name of your website. If you’ve already got a website, this part is already done for you. If not, remember a few things:
- Stick with the standard .com name unless you run a charitable organization, in which case .org works just as well.
- Check out a search site like Instant Domain Search to make sure your site name is available or to get ideas on a name.
- If your ‘perfect’ domain name is taken, try adding things like “a”, “the” or “my” but I would stay away from hyphens
- Simple and easy to remember is the key. Take your time because it is very difficult to change your domain once you’ve already got things running.
Next you’ll need to choose a web host for your site which will store your site on its servers and provide support. I have used GoDaddy and Blue Host
for blogs. GodDaddy is very popular for its commercials but Blue Host offers one of the best deals for new bloggers. Or you can go the route of using a website builder like Wix. Best10WebsiteBuilders.com has reviews for many of these to help you make an educated decision for choosing one.
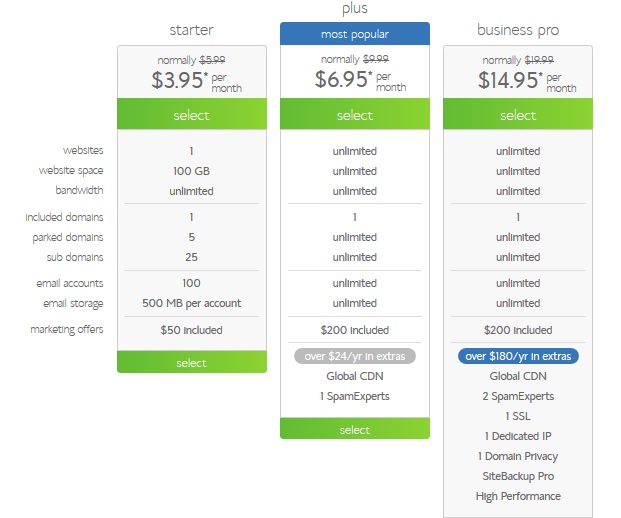
BlueHost offers a pretty simple installation process and an easy-to-understand platform. Along with different levels of service to fit your needs, they offer a money-back guarantee if you’re not happy. The standard pricing is $5.99 per month but click through to one of the links here and you’ll get the special offer of $3.95 per month for 36-months plus a free domain name and unlimited email accounts.
I use the “Plus” service since I run more than one site. If you are only planning on running one site then you’ll probably be fine with just the starter service.
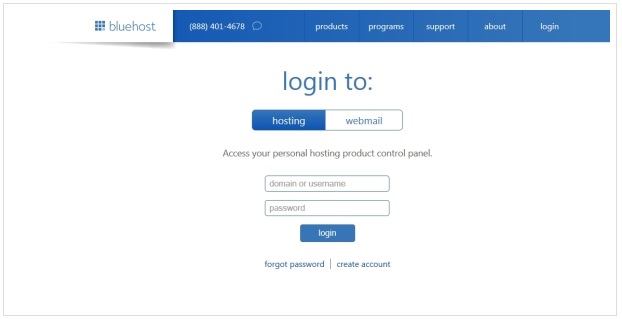
Crowdfunding Campaign Blog on BlueHost
The signup is pretty self-explanatory. You’ll fill in your account information and chosen domain name. You will be asked if you want a whole bunch of other products like site backup, site protection and others. I would just start out with the basic package and uncheck all these add-on services. You can add them later if you need them.
After you are done, you will be given a link to the BlueHost homepage where you will login to your hosting account or to your email. I suggest bookmarking this URL and adding it to your favorites at the top of your computer screen. You are going to be using the site a lot so might as well have it handy.
Crowdfunding Blog BlueHost Login
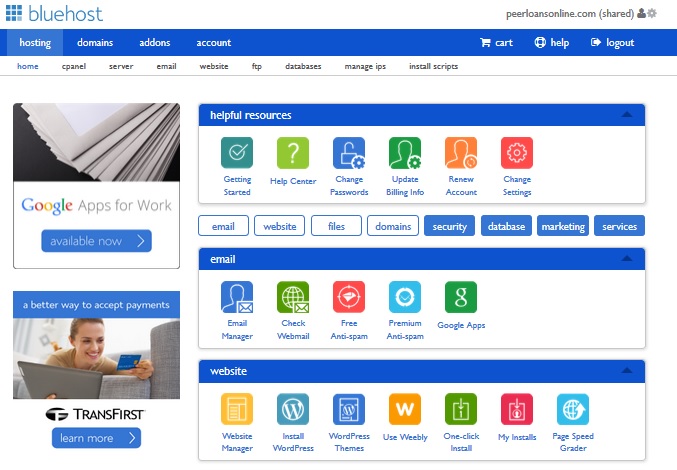
Once you login to your hosting account, you will click on “Install WordPress” under the Website section of the main screen. WordPress is the site builder you will use and where you will manage all the behind-the-scenes stuff for your site. Don’t be intimidated by all the buttons and choices on the screen, you’ll likely never use many of them.
Crowdfunding Campaign Blog BlueHost
The process to install WordPress is pretty easy as well. You’ll enter your domain name and create login information. When the installation is complete, click “View Credentials” to see the website address where you will access WordPress for your blog. This URL, something like http://www.yourblogname.com/wp-admin, is very important and you should bookmark it as well.
Once you login to WordPress is when the real fun begins. Within WordPress is where you will start to build your blog. Along the left-hand side of the screen you will see your menu.
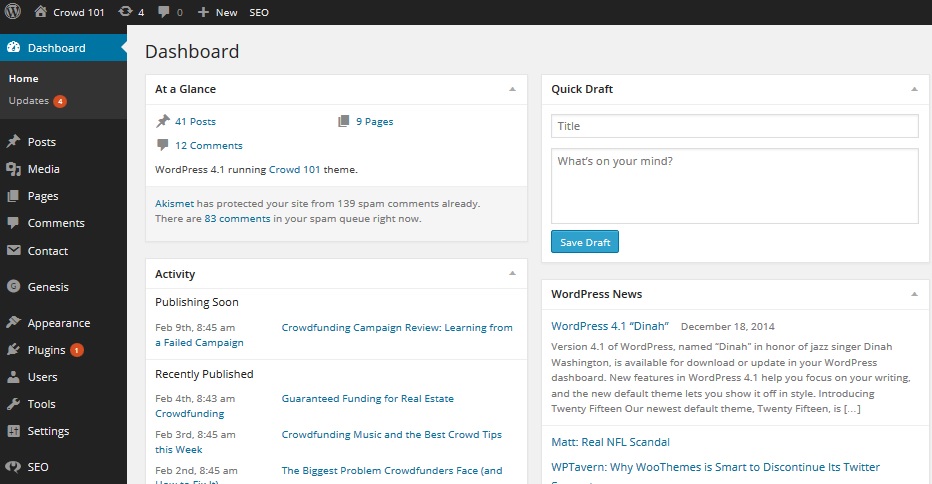
Crowdfunding Campaign Blog WordPress
Once you’ve got a theme installed, your blog is starting to take shape. You now need pages which are just main screens for your site. Almost everyone will need a few basic pages like: About Me, Contact and your main Blog page. Beyond that you might want other pages that are important to your site.
Creating a page is just a matter of clicking on the “Pages” menu item then “Add New.” You will give your page a name, add content and images and fill out some SEO information which we will talk about later.
Once all your pages are constructed, you will want to set up your menu which is under the “Appearance” item. Most sites have a Main Menu across the top of their website and a Footer menu that is down at the very bottom. Main menus help people get around while footer menus relay other valuable information like disclaimers and contact info. Place the pages in your menu in the order you want though the About Me page is usually the first on the left.
Next, you’ll add plugins to your blog. These are really cool tools that people have created to help you do things without needing to know computer programming. Clicking on “Add New” after “Plugins” will bring up a screen where you can search and select plugins.
Note: Some plugins are free while you’ll have to pay for others. I use a few premium plugins but you can build a really great blog on just free ones as well. When looking at new plugins, make sure you look at the most recent update and how many people have downloaded it. Plugins that no one uses might not be updated very often and might stop working.
The plugins I use on my site are:
- Akismet – comes preloaded on your site and is a great way to protect from spammers in your blog comments. The plugin automatically screens comments and will notify you when a legitimate comment needs approved.
- Broken Link Checker – Nothing is more annoying than clicking on a link in a website and getting a dead end. This plugin monitors all the links on your website and notifies you if one of them is not working.
- Contact Form 7 – is one of the many ways to build contact forms for your site. Easy to use.
- Digg Digg – is the floating (moving) social share buttons you see on the left-side of the screen. Really a cool way to get people to share your posts.
- EWWW Image Optimizer – Images can slow down the time it takes for your website to load on the computer, which is hugely annoying for visitors. An image optimizer plugin helps to reduce the image file sizes without changing how they look.
- Google XML Sitemaps – is another must-have because it generates a map of your site to help the search engines (Google, Bing, Yahoo, etc.) to find your blog.
- HelloBar for WordPress – is the orange signup bar you see at the top of the screen. Your email subscriber list is absolute gold and you need several ways for collecting emails.
- OptinSkin – This is a paid plugin but offers a nice tool to make pop-ups and subscriber forms. Not an absolute necessity but worth the money since you only need to buy it once and you can use it on as many websites as you want.
- RSS Multi Importer – puts a RSS feed on your site which can be a nice touch to provide your visitors with content from blogs or news sources you follow. Running a successful blog is all about making for a great visitor experience and giving them the information they need.
- UpPrev – is a cool feature that pops up a box after a reader has scrolled down a certain distance, say through 70% of the post. The box is customizable and features other posts as kind of a suggestion for further reading.
- WordPress Popular Posts – displays the most popular posts by comments or views and is customizable for where you want it to show and which posts to show.
- WordPress SEO by Yoast is one of the most popular plugins and really helps keep track of your search engine optimization, which we’ll get to later.
- WP Polls – is a handy plugin for making polls for your visitors to answer. It’s pretty basic but can help gather some useful information.
- WP Super Cache – This is another one that helps improve your site loading speed
Most plugins are easy to install and come pre-loaded with the most common settings. You might have to change a few settings to your taste but it’s all pretty simple.
Once you’ve got your plugins installed, you will want to finalize how your site looks by managing widgets. Widgets are just tools that let you place a plugin or item in a certain place on your blog. Go to “Appearance” and then to “Widgets.”
Moving these widgets around and customizing them is also pretty easy. You will place them in different spots of your website. The widgets are shown on the left half of the screen and you have website areas on the right side. You just drag a widget to that area and it will show up as a dropdown item, i.e. the Text widget in my Header Right section. By clicking on the dropdown for the widget, you can customize how it shows up on the site.

Crowdfunding Campaign Blog Widgets
I like to include WordPress Popular Posts and a User profile at the top of the Primary Sidebar (the right-hand column of the site). That showcases some of your best work for visitors and introduces yourself.
Once your blog is all set up, you will want to start writing. Click on “Posts” and “Add New.”
You’ll first add the title and the content for the post. I write all my posts up in Microsoft Word and store them in a file for easy organization and then paste it right into WordPress. You can also just type it right into WordPress as well. To link words from your content to another website or to another post in your website, highlight the words and click on the little chain symbol in the tool bar. Input the website address to where you want to link and check the “open in new window” box so people clicking the link do not get taken away from your site.
Linking to your other posts helps to keep people reading and helps improve your ranking in Google by telling the search engine that this post is important. Linking to other sites is a helpful way to share information and build relationships with other bloggers.
A note on post length, the standard thinking is that search engines will not look at your post unless it is more than 300 words long. This is misleading and leads to a lot of bloggers pumping out poor quality posts between 400 and 600 words long. Getting found by the search engines is about quality, not quantity. In fact, research on the length of top ten posts that appear in search shows that average length is around 2,000 words.
There are a couple of reasons why this probably happens. First, if you are writing about a specific topic and you cover four pages of material then the post is likely to include a lot of keyword information for the search engines. The other reason is that super-size posts, quality ones anyway, are more likely to have information that is useful to readers. That makes the post more likely to be shared which is a big factor for the search engines. If Google sees that a post is shared hundreds of times then it assumes it must be quality content for the appropriate keywords. My posts tend to be a little longer (I just can’t seem to shut up) but generally anything between 750 and 1,250 words is good.
Adding images into your posts is a good way to break up the monotony of reading a long article. Put the cursor where you want the image to show and click “Add media.” You will either add the image from your library or upload it from your computer. You can adjust the size of your images so they do not take up the whole screen. Make sure you include a title, caption and description for the image. The search engines scan images also and it is a way to help your search ranking when someone looks for a keyword.
You will want to add categories to your blog and place your posts in one or more. This helps visitors go directly to material that interests them most. There is a category widget that you can place on your blog that will show the categories and how many posts are in each.
You will also want to add some tags to your post. Tags are a way of telling readers and search engines what the post is about. They are not your keyword but may be variations or other related keywords or phrases. I usually include four tags to every post.
An important part of your post is the Featured Image, selected at the lower right-corner. This is the image that will show on your blog page before people click through to your article. A really interesting image can help persuade people to click through and read the post. As with other images, it is important to add meta information and descriptions so the search engines know what the image is about and can help you get found.

success in crowdfunding
If you installed WordPress SEO by Yoast, making your post search engine friendly is really easy. Search engine optimization (SEO) is a set of tasks that makes your site or individual posts stand out to the search engines like Google and Bing. The more you stand out, the higher up in search you’ll appear and the more people will click to your site.
The first part of SEO is picking a keyword that is relevant to the post. A lot of bloggers spend a ton of time picking keywords but I am not really sure it’s necessary. Your keyword is the main topic or idea for your post. Having that keyword appear at strategic places in your post, like in image descriptions and your title, will help your article show up in search results when someone types in that word or phrase in Google. Your keyword should be natural to the material and should be pretty easy to pick out after you’ve written the post. For good keyword optimization:
- Try to have it in the title if it sounds natural
- Try to place the keyword or phrase in the first paragraph or first few sentences
- The “Meta Description” is what will show up to describe the post in search results. It is a one or two sentence teaser description and should include the keyword
As mentioned, a lot of people spend tons of time on keywords. They stuff it into the post until reading becomes awkward. They increase the font size of the keyword to the point that it looks ridiculous. These things used to be old tricks to ‘fool’ the search engines but really don’t work much anymore. Just write good articles that will interest readers and the search engines will find you.
You can either publish the post immediately by clicking “Publish” or you can schedule it to automatically publish later by clicking “edit.” I write up all my posts at least a few days ahead of schedule and then just load them up. This helps to make sure that you publish new posts regularly even if something comes up at the last minute. Readers appreciate some regularity for a blog and keeping to some kind of a schedule will be rewarded by constant readership.
That’s just the quick detail on how to start a crowdfunding campaign blog. Be sure to click through the link above to our new post on starting a blog to see how to get people and even how to make money on your blog after your crowdfunding campaign has closed.


